

The Android Developer Options menu contains a variety of settings that allow you to debug and tweak your device’s performance. By changing the options in this menu, you can make your device run faster, smoother, and with fewer problems. In this article, we’ll take a look at some of the more important developer options and explain what they do.
To access the Developer Options, you need to tap on your device’s “Build Number” 7 times in the About Device screen.
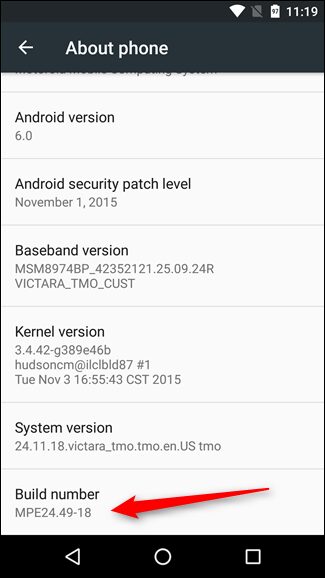
This will enable an entry called “Developer options” in the System Settings menu. Once you enable the Developer Options, you’ll see a new entry in your System Settings menu with a bunch of settings.
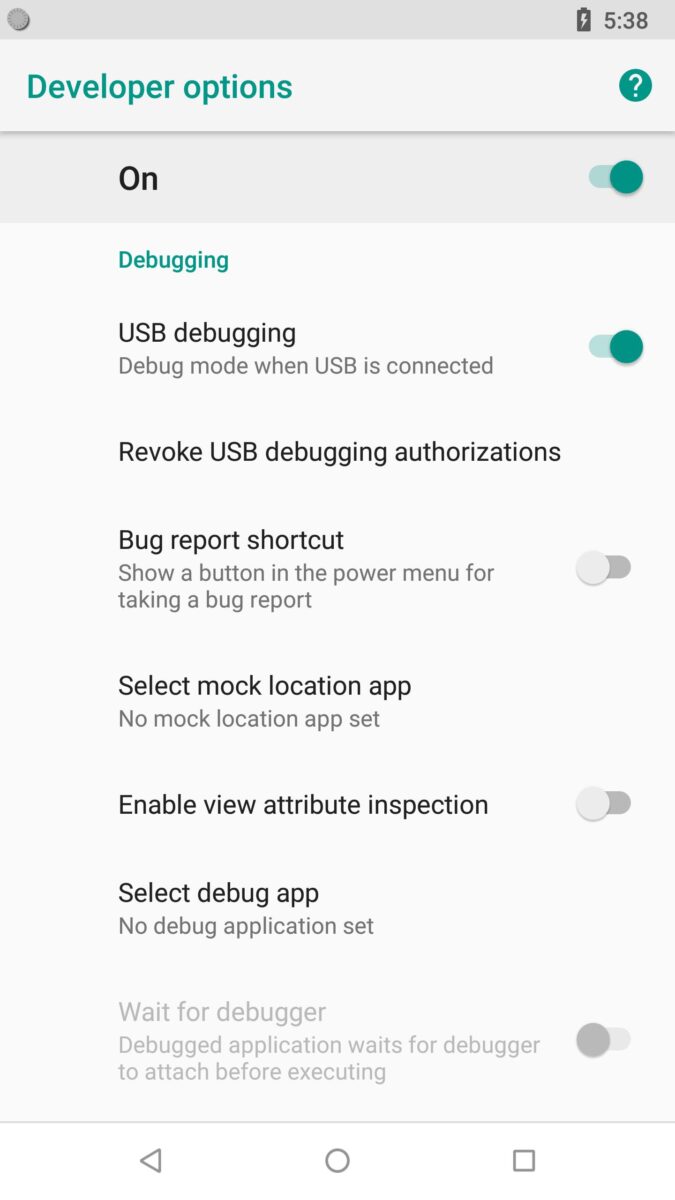
Now that you have activated the Developer Options, let’s see what kind of hidden settings are available for tweaking under these conditions. Developers usually use this hidden menu for debugging and performance analysis purposes.
Important Developer Options
The most important developer options to be aware of are:
- Drawing – This section contains various options that control how graphics are drawn on the screen. Try changing the “Screen Resolution” option to “Optimized for Tablet” if you’re using a tablet, or “Force GPU Rendering” if your device has problems with graphics rendering.
- Debugging – This section contains options that allow you to debug your app by monitoring its CPU and memory usage, as well as its network traffic. The “Logcat” option is especially useful for troubleshooting errors in your app.
- Performance – This section contains options that allow you to monitor your device’s CPU usage, running processes, and other behind-the-scenes data. Some of these options are especially useful for developers because they’re related to how certain apps are launched on the system.
- Storage – This section contains disk-related options. You may not need to change anything here, but the “Cache partition” section can be useful if you want to manage space used by the app data and other files (tap on “Manage Space”).
- Hardware Acceleration – Switch this option to “OpenGL(Recommended)” or “VDPAU” if your device has problems with graphics acceleration.
- Developer Options – The final option in the Developer Options is a general section where you can enable or disable debugging features, battery stats, and other options. This is the place to go if you want to activate any of the developer options mentioned earlier.
That’s all you need
All other options include
- Stay Awake – Keeps the device’s screen on while charging
- Background Process Limit – Limits how many background processes can run at the same time
- Show Touches – Shows a visual representation of where touches are occurring on the screen
- USB Debugging – This allows you to debug your app by connecting your device to a computer via USB
- Window Animation Scale- Controls the speed of window animations on the device
- Animator Duration Scale – Controls the speed of animator durations on the device
- Hardware-accelerated rendering – Turns on hardware acceleration for 3D graphics. This can improve performance, but may also cause problems with some apps.
- Enable/Disable OTAs: This will either enable or disable Over The Air updates to your handset.
- Usage Statistics – This option sends diagnostic and usage data to Google. If you’re not entirely comfortable with this, you can toggle it off here.
- Enable/disable automatic rendering of apps on secondary displays – This will either enable or disable apps from automatically being rendered on any other displays that are connected to your device.
- Trust Agents – This option allows you to manage a list of trust agents – which are basically services that can be used to authenticate your identity.
Developer Options Wrap-up
So that’s an overview of the Developer Options menu in Android. As you can see, there are quite a few settings here that can be useful for tweaking your device’s performance and debugging your apps. If you’re not sure what something does, be sure to research it online or ask a developer friend for help. And as always,
That’s a quick look at some of the more important developer options in Android. As you can see, they provide a wealth of information and control over how your device behaves. With a little experimentation, you can use them to improve your overall Android experience.
Top Things to Do in Android Developer Options
You could for example get better performance by selecting “Force GPU Rendering” under Developer Options. This will force the apps to use GPU rendering when possible which is usually more powerful than CPU rendering. You could also set your animations speed to 0.5X under Developer Options. This means that any app’s animation time would be reduced by half which makes it feel smoother even if you have animations turned on.
If you want to make the system smoother, disable “Force GPU Rendering” and set your animations speed to 0.5X as well. You could also try reducing your dpi by selecting “Smaller (110)” under Developer Options as this reduces UI Scaling Factor and hence makes everything look smaller( even though it looks bad ).
If you have a rooted Android phone, we recommend giving getting a CPU app a try . It gives you many options for overclocking, underclocking, and changing governors but I personally use it just to set my min & max speeds, update control frequencies, etc.
If not, then don’t worry, rooting device is easy and can be done on almost every phone!
Changing min-max speeds ensure that whenever an app demands more speed, it gets it and whenever an app isn’t using the CPU much, it slows down to save battery.
If you set Governor Control Frequency to “ON” and check which frequency is higher when your phone isn’t under load and then you can use that frequency for higher min & max speeds.
Just remember that if your phone becomes unstable or reboots randomly, just restore all frequencies to stock settings. With all that good luck with tinkering on your phone and always make sure that you know what you are doing!


